By
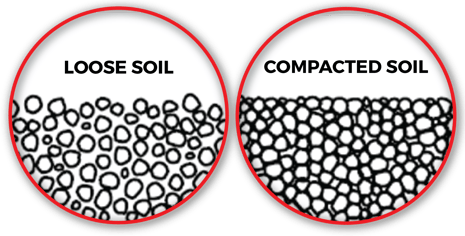
By The concept of a base paver is fairly basic; the plate vibrates below the machine causing smaller particles in the soil to settle in the voids of the material underneath, forming a sturdy compact base.
 Although there are various materials that require a compacted base; paving slabs, stone pavers, brindle blocks, and concrete blocks to name a few, the processes described below is best practice and suitable for all pavers mentioned– as well as numerous other applications. However, like any piece of equipment, the effectiveness of the operator will have an impact on the results. Learning and fine tuning, this simple 4 step process, is beneficial for numerous paving projects.
STEP 1 – EXCAVATING / DIGGING OUT
It is important remove enough ground required for the depth of the base, taking into consideration the depth of the pavers you are using. Use your judgement to decide if the newly excavated ground can support the aggregate / stone you will later apply, without the need to first compact the soil surface. It will vary by situation.
Try and wait for the ground to dry if it is a little wet before compacting, but if its unavoidable, add a small amount of large gravel to help bind the wet surface and continue compacting.
Step 2 – Add the Sub-Base Material
Once the ground is fairly solid, you can start adding the sub base material. The composition of this material may vary depending on your preference and/or geological location; limestone (or sandstone) is commonly used. Having a good mix of large and fine particles is recommended for successful compaction.
Place the sub base in 4” to 8” lifts if possible, but be aware the compaction force of the machine may require you to adjust this. As a good rule of thumb, adjust your lift height in the ratio of 1” of material for every 1000lbs of compaction force.
For example, a plate compactor with 3000lbs of compaction force should have a lift of no more than 3”. If 4” is required in this case it would be better to achieve this with two 2” lifts.
The thickness of these layers is important. If it’s too thick the machine may not compact effectively, if it’s too thin for the compaction force of the machine may result in over compaction where the density of the material decreases.
Compact the sub-base after each lift; check the moisture level of the sub-base before compacting – a handful of material should hold together when squeezed. If not moist enough, use the water in the onboard water tank (if available) or a garden hose to dampen it, but be careful not to saturate it. Repeat this process for as many layers required to achieve the depth of base needed to support the pavers being used.
Step 3 – Lay a Sand Bedding
Once the sub-base material has been properly placed, adding sand is the next step.
This sand is what the pavers will be sitting on directly, so it’s important to prepare the surface thoroughly. Typically, a 1” layer of sand is applied all over the work area. It is essential to provide a softer layer for the pavers to settle into – otherwise they may crack or break in the next stage of the process. Avoid high-spots or valleys, reworking them if need be in order to get a flat surface.
Step 4 – Place Pavers in Position and Compact
Place chosen paving stones or blocks in the desired position, on top of the freshly prepared sand. When satisfied, run the compactor over them to bed them into the surface. This typically requires a minimum of 2 passes.
 Finally, finish off the process by running the compactor over the pavers while adding fine sand between the joints to settle the pavers and create the necessary density between them to keep them stable.
>>IMPORTANT<< When running the machine on top of the pavers, we highly recommend using a VIBRATORY PAVER ROLLER to work your polymeric sand material into the joints, while minimizing potential damage to the pavers and the machine. Using a urethane mat on your plate compactor is another good option. Protecting your material from chips, cracks, and breaks is essential, especially when using synthetically manufactured pavers common in North America.
The basic principle of compacting any material is the same: put the material down in layers and compact between each one.
Of course, we aren’t saying this is the only way to lay and compact materials because every situation is different.
With experience and understanding of compaction equipment, various environments, types of stone, aggregate and other materials available, you’ll be able to effectively tweak this best practice process effectively, to achieve the best results for your project.
But if you’re not sure or just starting out – following this guide will provide a good starting point in achieving a fantastic finish.