By
By 
*If you haven't already read, A Beginner's Guide to Troweling Concrete - Part 1 we suggest checking that out first*
Concrete finishing is done after floating to produce a dense, smooth, hard surface. Two or more successive passes may be necessary to produce the desired floor surface. It's important to take the necessary time between successive passes to allow the concrete to reach proper set.
Some contractors find it more productive to use two machines. One is equipped with float blades and the second with finish blades.
This allows floating and subsequent finishing operations to proceed without delay. The extra machine can also be used as a spare in case of a breakdown.
For both floating and finishing operations, the angle of the blade is important (see Figure 1).
Figure 1
 ^Here we can see the angle of the blade is flat.
 ^Begin first pass with blade raised slightly (unless an old blade) ...
 ^ With each successive troweling, increase the angle of the blade (maximum should not exceed more than 1" [2.5cm]). On each successive pass the angle is slightly increased to exert greater pressure on the hardened surface.
The increased blade pressure provides a dense, durable concrete surface.
Caution:
When a trowel blade is tilted or pitched at too great an angle, you may start to notice ridges along the radius lines as you're sweeping the trowel- this is called chattering, or trowel chatter. If this occurs, reduce the tilt and continue troweling until the surface is smooth and level.
Machine movement
Understanding machine movement is important for achieving a proper finish. Power floating is started in the direction perpendicular to the direction of bull floating. (see Figure 3 below for floating and troweling patter).
If a second floating pass is made it should be at a right angle to the first pass, and successive troweling operations are perpendicular to initial troweling. Each successive finishing pass should overlap the previous pass by half the width of the machine. This type of finishing pattern will ensure complete slab coverage and minimize surface imperfections.
Multiple Slabs Poured Adjacently
When two different slabs are poured adjacent to each other, the concrete may be softer on one side of the screed than the other side. In this case the machine should run parallel to the seam where the two concrete slabs come together. The blades should overlap the seam by just a few inches. If a machine is run across the seam, you could end up with a bump.
Typically, concrete placed first should be floated and troweled first, but it's important to understand that some areas will set faster than others, and must be finished in the order they are setting.
When outside, concrete in the sun will set faster because of the heat. When inside, concrete near door openings may set faster because of being exposed to the wind and air drafts.
When the concrete is ready, float and finish the surface in a regular pattern. Make sure that each successive pass overlaps the previous pass by half the machine width as shown in Figure 2 below.
Figure 2

Bull floating (show on left) is done side-to-side, while the power floating is done around edge (shown on right). Trowel in a north-south pattern on first pass and an east-west pattern on second.
Remember that the machine should not be operated in one spot for very long. The machine is moved across the slab in a sweeping motion—like in hand finishing.
While the operator’s footprints will be troweled out, he should wear rubber boots to minimize surface disturbance.
Correcting Excess and Valleys
Defects in the surface can be fixed by using a different finishing pattern. Humps and valleys left after floating can be corrected during the finishing process. Low spots are filled by going around them in a clockwise direction, then continuing with a normal pattern. High spots along the form can also be corrected as shown in Figure 3.
Note the direction of machine travel relative to the defect.
Figure 3
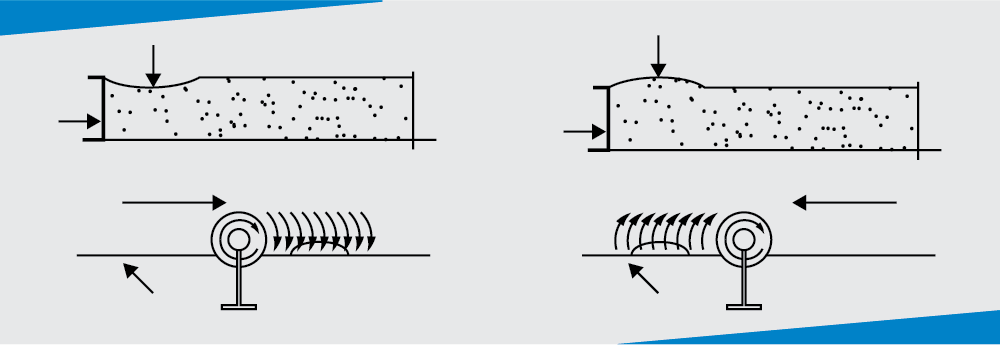
When there is a valley, operate the machine in direction seen on the left. This will pull concrete into it the valley. When there is excess concrete causing a hump (seen on the right), trowel in a direction that moves the concrete away to flatten it out.
Completing all of these steps and adhering to these guidelines will help ensure that you create the perfect troweled slab.