

 By
By
The concrete polishing process
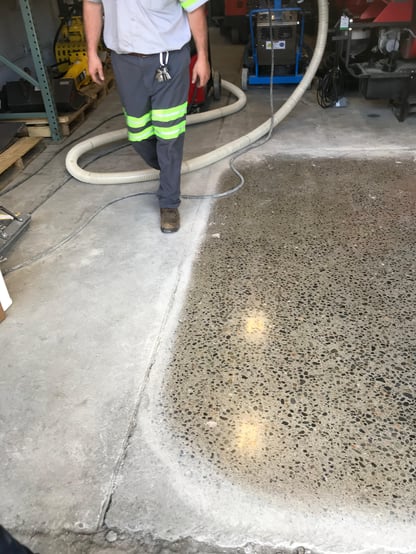
How do you get from an unimpressive, common concrete floor to a beautiful, highly reflective, finished concrete surface like the example above? As a contractor, having the ability to make this transformation gives you a great sense of accomplishment. and it should, not many contractors know how...
To make this transformation, you simply grind the surface of the concrete then polish it to the desired finish... This process is for sure easier said than done. but, fortunately, the process has been simplified...
In this article we will go over the steps to polish a concrete slab from “Start to Finish”, using the Bartell Global Complete Concrete Polishing System.
The Bartell Global process…
Concrete Polishing
IN FOUR STAGES
![]()
- Grinding… This first stage uses Metal-Bond diamond segments.
- Honing… the second stage or phase uses Hybrid/Transition diamonds.
- Densification… this critical part of the process uses Sodium Silicate, Lithium or other chemicals to harden the surface of the concrete, enabling it to retain the finish for years with minimal maintenance.
- Polishing… this last stage uses the Resin Bond polishing pads to give the floor its incredible shine and reflection.
Let’s consider each stage individually…
Stage 1: Grinding 
The grinding stage for Bartell Global’s system consists typically, of 2 Grits of diamonds…
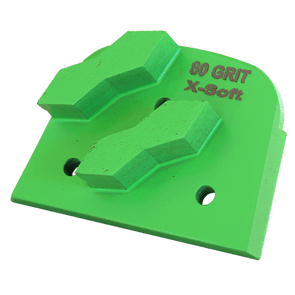
- 40 Grit Metal Bond Diamonds
- 80 Grit Metal Bond Diamonds
First step... you will start with a 40-G. Metal Bond Diamond segment and grind the floor, achieving a fully refined, equal base "Scratch pattern" with no gouging.
After this initial step, the next step is to repeat the process using the 80-G. Metal-Bond diamonds.
With the Bartell Global system, you typically have only 2 steps in the Grinding stage.
When you have completed these first 2 steps, Stage #1 Grinding is complete…
Just a few important pointers when grinding…
- Limit your speed… Most planetary grinders should be set at between 350 - 500 RPM's on their speed dial, it is important NOT to perform these steps at higher RPM”s as the diamonds do not cut as well at higher RPM”s and can actually cause damage to your diamonds, they can "Glaze over" and stop working all together.
- Overlap your passes... Each machine is different, but you must overlap 25% – 50% to insure a consistent streak free result.
- Crosshatch… (Grinding North and South then grinding East and West). This minimizes the possibility of leaving streaks in the floor known as “Corn Rows”.
- Grout Coat Option... During the grinding part of the process, a lot of contractors will apply a "Grout Coat", this is a fine skim coat of material that is troweled down and fills in the very small, fine, holes and cracks in the surface of the concrete that can dull the finished product if not dealt with. there are many different products used for this and most need to have a Metal Bond diamond's aggressiveness to remove excess grout material, that is why it is applied at this stage of the process.
- Wet or Dry… this stage can be done grinding wet and removing the slurry or dry using a Hepa Filter dust extraction system. you must use one or the other to control and remove the dangerous silica laden dust generated in the process.
- Diamond Bond… It is critical to choose the correct “Diamond Bond” for this step, there are most commonly three choices in bond, Soft, Medium, and Hard bond diamonds... Basically, the rule of thumb... Hard bond for Soft concrete, Medium bond for Medium concrete, Soft bond for Hard concrete.
- Cream Polished Finish... When producing what is referred to as a "Cream Polish finish" little to no Laitance or cream top is removed, that is what you are polishing with this method. So, you never start with a "Metal Bond" diamond as this removes the Laitance permanently! and can not be returned to the surface. you would instead start the process with either a 50 or 100 Grit. Hybrid diamond. Always start with a less aggressive pad and if necessary switch to a more aggressive pad. (Those will be covered next step)
CLICK HERE FOR MORE INFORMATION ON CHOOSING THE CORRECT DIAMOND BOND FOR YOUR CONCRETE
WHAT IS ACCOMPLISHED IN STAGE #1…
- sealers, and contaminants on the floor are removed.
- Laitance is removed… The top layer of the concrete, often referred to as the cream, is a weak layer of fine cement dust, lime as well as very fine sands, this is removed to expose the harder surface below.
- “Open up”... The surface of the concrete is opened, making it very porous, if you can imagine a rock hard sponge, that is how the concrete surface appears under a microscope. At this point the slab is easily able to soak up moisture, oil, or easily stained, not a good thing, but unavoidable at this point! The good news… This will be rectified in the steps to follow.
- Produce the desired finished product… The Grinding stage is when we produce what the final appearance will be. We expose the sand and aggerate just below the Laitance, moderate grinding exposes mostly the sand often referred to as a “Class B Salt & Pepper” exposure or finish.
If large aggerate exposure is desired, you would start with a more aggressive diamond, a 25-G diamond then progress to the 40-G step and then the 80-G step. You can also simply make repeated crosshatched passes with the 40-G diamonds and grind progressively deeper into the slab and this results in exposing larger aggerate. What is referred to as a “Class D Large Aggerate Exposure” or finish.
CLICK HERE FOR AN EXPLANATION ON CORRECT TERMINOLOGY
Stage 2: Honing

This stage is considered the transition stage, where we are transitioning from a very aggressive tooling, the Metal-Bond diamonds that have produced a smooth, consistent, but also a very porous surface and will transition to the final polishing steps of the process. At this stage, we are starting to "Tighten" or "Close up" the surface of the concrete making it less and less pours. We will be using Bartell Global’s Hybrid series of tooling
The Honing stage consists of 4 steps, (With an important stage inserted…)
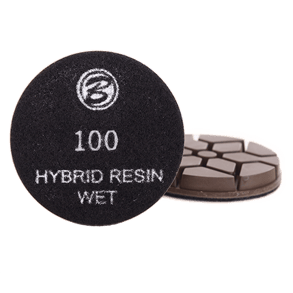
- 50 Grit Hybrids
- 100 Grit Hybrids
- Densification
- 200 Grit Hybrids
- 400 Grit Hybrids
These 4 steps are accomplished by beginning with the 50 Grit Hybrid pads and running them just as you did with the Metal Bond diamonds on Stage 1. crosshatching each step progressing through all 4 steps.
Just a few additional important pointers…
- Speed up your machine… With most Planetary grinders, you would start increasing your RPM’s to 550 - 800 RPM's with Hybrid Transitional diamonds.
- Wet or Dry… Bartell Global provides this series of diamonds in either a “Wet” operation diamonds or a “Dry” version,
Honing wet is less expensive, less equipment to purchase, water reduces friction and acts as a lubricant resulting in the diamonds staying cooler, they don't damage due to excess heat and last longer, there is no chance of dust getting into the air protecting workers from the hazardous affects of silica dust., but you do not achieve the same high shine as the dry method as well as you have the necessity of dealing with the concrete slurry that is produced in the process and is considered hazardous waste and must be dealt with accordingly.
Honing dry, is faster, environmentally friendlier, and more convenient. it also produces a clearer, deeper shine. but, it has a higher cost associated to it, more equipment is needed like Hepa Filter dust extraction systems that must be used correctly to avoid silica laden dust escaping into the air creating a possible health hazard.
- Overlap & Crosshatch… when honing, you are still “Cutting” the concrete surface though not nearly to the extent that you were during the Grinding stage, but to minimize streaking it is best to overlap each pass and crosshatch. as you get experience with the process, you will find that on many slabs you can crosshatch just between grits. This means that you can work the floor North & South with the 50 Grit Hybrid pads then work the floor East & West with the 100 Grit Hybrid pads, repeating with the 200 Grit and 400 Grit pads...
WHAT IS ACCOMPLISHED IN STAGE 2…
The answer is… a lot. We are…
- Removing the fine scratches… scratches produced during the grinding stage must be removed or they will show up during the polishing stage, resulting in an unacceptable finish.
- Closing up… here is where we deal with the porousness of the slab. With Hybrid diamonds we are closing up or tightening the surface of the concrete, making the surface of the slab far less permeable.
- Preparing it for the Densification step… it is very important to Densify at the correct point in the polishing process, we will cover this in the next stage.
- Transitioning the slab… from a rough, very pours surface to a hard, semi-impervious surface ready for the final steps, to be polished.
Stage #3 Densification…
Stage 3: Densification

This critical part of the process commonly uses Sodium Silicate, Lithium, or other chemicals to harden the surface of the concrete. it comes in a liquid form, with the look and consistency of water but is very different. Each type of densifier is applied differently as well, so be sure to review the directions for the specific product you are using.
While Densifying is not part of mechanically polishing concrete, it is an integral part of the process itself and all correctly polished floors must have this step as part of the process.
What happens when a concrete surface is densified? Simply put, Densification is a chemical reaction between the densifier and certain inert compounds in the concrete, filling in the micro-cracks and voids with crystal growth making the concrete not only "Dust Proof", but makes the concrete up to 400% harder than what it was, giving the finished concrete surface many years of low maintenance performance.
CLICK HERE FOR A DETAILED EXPLANATION OF WHAT DENSIFICATION DOES
When do we densify?... Most commonly midway through Stage #2 as indicated above, notice it shows being between 100 Grit and 200 Grit, this will vary depending on the condition of the slab, mostly if it is considered a soft or hard slab and its porosity. for instance, soft concrete typically is densified earlier in the process and sometimes receives repeated application of densifier to get it to the acceptable hardness to hold a shine.
On concrete slabs, there is what is referred to as a “Sweet spot” where the concrete surface is still absorbent enough to accept the densifier but not so absorbent that it sinks too deep into the slab and dilutes. conversely, the surface must not be so "Closed up" that it does not accept the densifier, and it just sits on top and you do not get penetration. Most densifiers you want concentrated at the surface of the slab.
Apply densifier according to the directions and in most cases you are ready to continue the polishing process as soon as the floor is completely dry.
Stage 4: Polishing
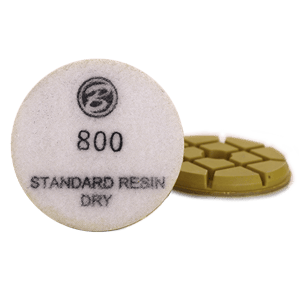
It is at these final stages that the change with each pass really becomes noticeable.
This is also the point where you can be finished if you wish... The floor has been ground, Densified, and honed to a 400 Grit finish. If you are wanting a “Matte” finish, you have achieved that and no more steps are necessary, you are done. with some but not all densifiers you may apply a sealer, or a guard, burnish it and you are finished…
But, if you are looking for that high gloss, clear reflection then the next step, the 800 Grit resin pad will make the floor POP! They call the 800-G pass “The Money” for a reason, it is this pass where you really see the reflection appear! The difference between a 400-G matte finish and a highly reflective 800-G finish is Night & Day.
From here it is just a matter of how much reflection you want. You have the option to polish with 1,500 Grit pads and 3,000 Grit pads, just depending on what level of reflection you or your customer is looking for. Once achieved, you are finished! Again, with some densifiers materials you would put a sealer or guard down and burnish.
LAST STEP... Typically the last step in the polishing process is hitting the floor with a high-speed bernisher, as mentioned, some sealers and guards require it but even if they do not, burnishing gives the floor a final "POP" as well as removes any "Resin Smear", residue of the resin pad, that might be on the surface of the finished concrete.
Just a few additional important pointers…
- At the polishing stage, we really kick up the RPM's to 1,000 - 1,200 RPM's
- If adding additional weight to your machine is possible, it will help produce a clearer reflection in the surface of the concrete.
That is the simple, straightforward, turn-key Bartell Global complete concrete diamond polishing system...
--------------------------------------------------------------------------------------------------------------------------------------------------------------------------------------------------------------------------------
RELATED INFORMATION INPORTANT TO THE PROCESS...
Before starting any concrete polishing project...
- Manage Customer Expectations... probably the most important step in the concrete polishing process... How so? Because It is not the end-user's responsibility to know what to expect from their floor. They for the most part, do not understand our industry at all, they are knowledgeable about facts in their field of expertise. It is our responsibility to show them what is possible for their floor and educate them on what to expect, both the good and the bad... Trust me, you will sleep better at night!
- Always do a Test, Sample, Polish Sometimes referred to as a "Field Panel", do this in an inconspicuous area, do it for two reasons... first, it allows you to get a "Feel" for the characteristics of that specific slab and what will be involved in polishing it and most importantly, getting the end user's approval of the finished product.
- Never promise a Monolithic finish... There will always be variations in the finish of the surface from cream, salt & pepper and aggerate exposure.
- "Cream Polishing" never use a metal-Bond diamond if you are asked to provide a cream finish, this will remove the "Cream" and once removed can not be replaced.
- all concrete slabs are unique and all polishing systems must be adapted to the individual slab.
- the process described in this article begins with a clean trowel finished concrete slab.
NOTE... On other articles we dig deeply into important related subjects like... Edging, Grout coats, Densification, appropriate equipment used for concrete polishing, Concrete Slurry collection & disposal, understanding how Metal-Bond diamonds work, just to name a few, checking them out will help you have a broader understanding of the concrete polishing process.
Last important point... The process of the concrete polishing steps on paper is pretty simple but the onsite application can be confusing and frustrating epically when starting out because of the many variables encountered in the concrete slab. So, Be prepared...
WARNINGS AHEAD...

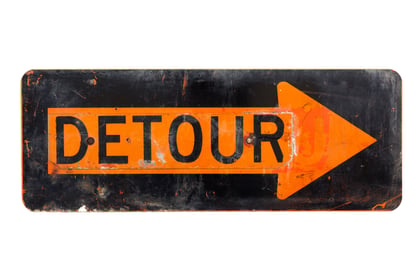
It is very important to note that like every polishing system available, the Bartell Global concrete polishing system is meant to be Customizable, it is a base from which to start. It MUST be. Because every concrete slab can be so different from each other that there is no hard and fast rule for all slabs, there will be difficulties, diamonds will not work as expected, and different diamonds must be used, (Potholes). you will, at times, need to progress in another way, possibly dry or wet or speed up, speed down. (Detour) This is an expected part of the process. But, this can also be a good thing, by the way, because some slabs allow you to skip steps saving you time and money.
So what are some of the variables that change concrete?
- Age... Concrete never stops getting harder, the concrete you walk on today is harder than it was yesterday and softer than it will be tomorrow.
- PSI... the hardness of concrete greatly affects the choice of tooling used.
- Concrete Admixture... all the various additives added to concrete change its characteristics.
- Fly Ash, Steel Fiber, Aluminum Shavings... Materials added to make the concrete "Green", eco-friendly as well as stronger affect how it grinds and polishes.
- ASR, Alkali-Silica Reaction, Carbonized Concrete... Just more reactions that affect how a concrete slab polishes.
- Aggerate Used... What part of the continent you are on makes a big difference regarding its hardness and polishability... check out where you are on the chart below to get an idea of the typical concrete in your area...

In conclusion, if a contractor takes the time to learn the Bartell Global Concrete Polishing System, if you progresses to understand the variables involved in the process, concrete polishing can be a rewarding and lucrative business.