By
By 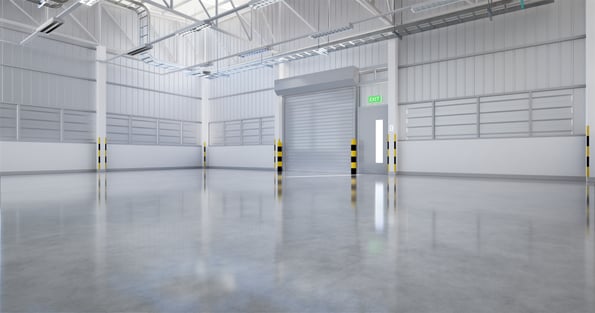
Polished and dyed concrete can be a beautiful and durable surface that lasts for many, many years. But (and it's a big 'but') grinding and polishing concrete with a planetary grinder is not a quick-and-easy process, even under the best of conditions. Professional concrete polishers know that there are floors out there that will really test your patience and your profitability.
What can be done to speed up the process on those challenging floors? Let's cover some concrete grinding methods that you may not be aware of that can be costing you time and money on your projects.
1. ARE YOU USING THE CORRECT BOND DIAMOND?
One of the most common mistakes that I see made on many concrete polishing job sites, especially by newer contractors is the mismatching of 'bond levels' on metal bond diamond tooling - in relation to the concrete hardness.

Metal-Bond diamonds, like you see here, are suspended in a metal matrix. This matrix (or 'bond') holds the diamonds in place through the grinding process, slowly wearing away and continually exposing more diamonds to grind the floor.
Because concrete comes in a wide range of hardness, you must choose the correct hardness of your diamond BOND tooling in order to grind effectively. If you choose too soft, the diamonds wear away prematurely. Too hard of a bond, you grind very slowly or not at all.
So, this is a critical point in choosing the correct diamond bond. The general rule of thumb for matching Diamond bond level to concrete hardness is this:
The harder the concrete - the softer the metal bond you use.
The softer the concrete - the harder the metal bond you would use.
Review the guide below for a more specific explanation...
=======================================================================
Metal Bond Tooling Guide:
For Matching the Correct Diamond Bond Hardness to Concrete Hardness.
Very Hard Concrete (6,000-8,000 PSI) ----------- Extra Soft Bond Diamonds
Hard Concrete (5,000-6,000 PSI) ------------ Soft & Extra Soft Bond Diamonds
Medium Concrete (3,500 – 5,000 PSI ) ------------ Medium Bond Diamonds
Soft Concrete (3,500 PSI and under) ------------ Hard Bond Diamonds
How do you tell if you have "HARD" or "SOFT" concrete? click the link below.
What Makes concrete hard or soft? and, how can I tell?
=======================================================================
CLICK HERE for more information on how metal-bond diamonds work
2. THE MAGICAL BALANCE OF DIAMOND SURFACE AND DOWNWARD PRESSURE
There are a number of Diamond Segment Shape Configurations on the market today but typically the most common fall into four groupings (of tooling segments shapes and configurations)
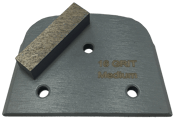
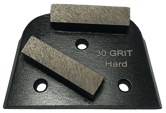
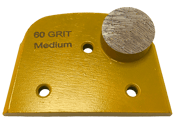
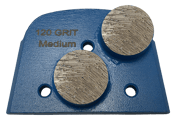
Single bar Double bar Single round Double round
So, what difference would diamond shapes and their different configurations make to the grinding and polishing process? One important part of effectively grinding concrete is the need for “downward pressure”. When grinding you need a balance of diamond grinding surface (the metal tool segments and their various shapes) along with sufficient down pressure (the actual weight of the machine head) in order to grind effectively.
For example:
If you have a light planetary grinder that is anywhere between 100–500 lbs. and you choose to use a double segmented diamond (round or straight bar) you will be distributing the weight of that 'light' machine across a greater diamond segment surface area than if you chose a single segment diamond. By using a single segment diamond you are now doubling your downward force compared to a double segment, making your diamonds cut more aggressively.
That having been said, It is important to note that double rounds can absolutely be used on smaller machines successfully on many floors. But if you’re on hard concrete and having trouble cutting the floor, you may want to try singles!
3. GRINDING WET
I hate grinding wet. And if you are anything like me, you hate grinding wet too. It's messy and there is a lot more clean-up work to do. But you may be making a mistake by not grinding wet (at least on your first and most difficult pass). Not many professionals are aware of this fact, but grinding wet actually aids in the grinding process, the slurry that accumulates is actually very abrasive, so you grind quicker, your diamonds stay cooler and you are likely to improve your production rate.
On the other hand, the slurry is also a huge headache. Slurry is considered hazardous waste and must be disposed of correctly (unlike dry bagged concrete dust which can be disposed of in a regular industrial trash bin).
Why is dry concrete dust not "hazardous waste" and wet is? It has to do with its higher PH levels, higher risk of toxicity & contaminants, and the very real risk of the slurry migrating to a waterway.
CLICK HERE FOR MORE INFORMATION ON DISPOSING OF CONCRETE SLURRY
With new innovative ways of disposing of slurry it really isn't the big deal it once was. But it's important to be aware of local bi-laws for the disposing of slurry so that you avoid any fines or lawsuits to you and your business, as well as help keep the environment protected.
I don't like grinding wet but, I LIKE getting my projects done FASTER & MORE PROFITABLE more than I HATE GRINDING WET!
4. WATCH YOUR SPEED!
Another common mistake when grinding (especially with new operators) is that it is easy to become frustrated with the slow progress you seem to be making when making those first cuts to a very hard concrete floor. But it is a mistake to increase grinding speed in order to improve production rate. While this may seem to make some sense, typically you end up with the opposite result. And this is why: higher grinder speed equals higher diamond temperature. At high temperatures, your diamond tooling will "glaze over" and literally seal the diamonds under a hard, slick surface that stops the grinding process in its tracks.
So, just like drilling into steel with a drill bit, the bit cuts much better and lasts longer at a slower, cooler speed. You will find this true with cutting concrete as well.
On Bartell Global's Predator grinders I am used to, I usually run metal-bond diamonds around 4 1/2 – 5 1/2 on the speed-pot that goes from 1-10. So roughly half speed.
5. GET RID OF THE GLUE!
If you are removing existing flooring before you grind — floors like glued down carpet, sheet vinyl, rubber flooring, and especially VCT — there is usually a lot of mastic that is left adhered to the concrete and it will cause problems. It is really important to REMOVE AS MUCH OF THE OLD MASTIC or GLUE AS POSSIBLE before grinding the concrete because old mastic acts as a lubricant between the floor and the diamonds. So, when you attempt to grind a floor with a lot of mastic still on the surface of the concrete, the "lubricated" diamonds tend to just slide around instead of cutting the concrete.
Here are some ways to remove enough mastic to make your diamonds cut efficiently.
RIDE ON SCRAPERS
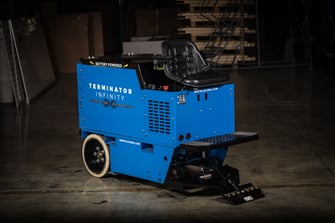
If you used a ride-on scraper like the Terminator to remove the old flooring you will oftentimes leave a lot of glue on the concrete. How do you get it off the concrete? You can install a nice new blade on the Terminator and then lift the machine to give it a sharp attack angle and slowly “re-scrape” the surface removing probably 90% of the glue. I like to sprinkle a little drywall mud powder on the sticky mastic as that helps retard the stickiness, it actually will "ball" the old mastic up making it easy to remove. Also, no health issues with drywall powder because it is gypsum-based material and is not a health hazard.
CARBIDE SCRAPE AWAY TOOLING
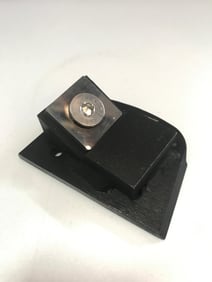 This type of tooling comes in a variety of mounting options, you can mount this tooling on diamond grinders as well as "swing sanders". So, how and when would you use carbide tooling? You use it after removing the old flooring and before your first cut with your metal-bond diamond. You run this carbide tooling over the floor removing 90-95% of the mastic and will make your diamond tooling much more effective on your first cut. Again, sometimes sprinkling a little powder on the surface balls up the old glue aiding in its removal.
CHEMICAL REMOVAL
I don’t usually recommend this option for a few reasons, but it is possible to chemically remove the mastic. Be careful with this option: if you are preparing a concrete surface for new flooring to be installed, the manufacturers of the NEW material being installed will often not warranty their product if the old mastic was chemically removed. The chemicals used to remove the old mastic can soak into the concrete and cause problems after the installation of the new product. It is possible—with the moisture of the new mastic applied along with the natural migration of moisture through the slab—for those chemicals to react with the new mastic, causing the bond between the new material and the concrete to fail.
On the other side of the coin, though, I have talked with contractors that use chemicals to remove mastic and they are confident that when applied properly and cleaned up correctly this issue is not a serious problem. They may be correct. But, I would recommend that you check with the manufacturer of the mastic and material being installed for their approval before using this method. And, if using chemicals, I would really make sure the cleanup is done correctly.
6. TAKE HALF CUTS
When running your grinder, try taking only "half cuts", A half cut is when you have half the width of your machine on the concrete that you have not ground and the other half on the concrete you already cut or ground. you will find that it cuts better. This is because, as mentioned earlier, the concrete “grindings” produced when grinding a floor actually helps wear away the diamond metal bond faster, exposing more diamonds and improving the production rate. This method works especially well when grinding floors that still have glue residue on them.
7. USE A FINE MIST OF WATER
Sometimes misting a SMALL amount of water on the concrete ahead of my machine helps the diamonds to stay cooler and cut better. By the time that the water is ground off the surface of the concrete and flows through 50 ft. of hose then goes through the pre-separator, it is dry by the time it hits the filters causing no damage. If you try this, be very careful and only lightly mist the floor, if you put too much water down and that moisture gets to your HEPA filters, it will ruin them and they will need to be replaced.
8. DON'T GET CHEAP ON ME!
It is a simple truth: you get what you pay for, so avoid buying cheap diamonds from discount brokers. While there may be good diamonds out there, somewhere, you never know what you are getting, good or bad. These diamonds are almost never as good as diamonds you buy from your machine manufacturer. Or, a diamond recommended by your machine manufacturer.
The reason for that is simple: machine manufacturers want you to be happy with the machines they make! So they spend a lot of time and money researching and testing diamonds to find the best diamonds that work the most effectively under their equipment. They have done the research for you!
So, at least, lean towards using the diamonds recommended by your manufacturer and you are much more likely to be successful.
9. GET THE CORRECT SIZE MACHINE
Too many contractors (I was one!) try to "wade slowly into the market". They purchase a small machine to use in their business. Which is great for small projects, but not if you are doing larger projects. You need to get the correct size machine for your specific project type. If for instance, you have a 20,000 square foot grind & polish project and you buy an 18" 110v machine and are disappointed with the production? It's your fault! You bought the wrong machine! (don't feel too bad, I did the same thing when I bought my first grinder). Most likely, the machine is performing as best as you can expect, it is just a little 110v machine that will never give you the production rate you need in order to be profitable on a project of that size. So, get the correct machine to start with. A project that size calls for a really big machine with a really big motor and a really big footprint to get the job done in an acceptable time-frame. My favorite is pictured below.
 Bartell Global's Predator 32NDX
CLICK FOR MORE INFO ON THE PREDATOR
A last and important thought is being aware of options! one big one is,
POWER TROWEL POLISHING
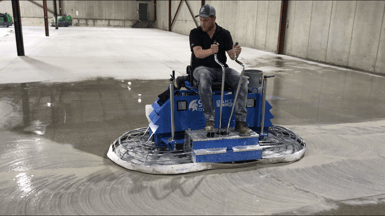
A fairly new polishing process in the industry is using Power Trowels to polish concrete. Both walk-behinds and ride-ons are traditionally used in the placement of concrete but are now being used in the polishing process and have an incredible production rate! While not applicable for all projects, the TPS System, when appropriate, delivers an incredibly fast polish! Ideally suited to very large polishing projects, warehouses etc., the TPS system is a great alternative to planetary grinders. You might want to check out this system by clicking the link below.
Click here to see the Bartell Global TPS concrete polishing system
If you are interested in a comparison of traditional planetary grinder polishing and Power Trowel polishing check the link below.
Click here for a comparison of Planetary grinder polishing & Power Trowel polishing
So, when dealing with hard concrete, your production rate can surly be frustrating, but, having a few "tricks up your sleeve" can often help in getting your projects back on a profitable timeline.